Review and approve each client's statement individually, or batch approve all or a group of client statements after reviewing them offline.
Review and Approve Individual Client's Statements (Figure 29a)
| 1. | Click on a magnifying glass icon to review an individual client's pending statement. |
| 2. | Verify that the statement transactions are accurate. |
| 3. | Add a personal note at the bottom of the statement screen. (optional) |
| 4. | Click Approve & Save to make the statement active in the client's online account. This process moves the previous statement to the client's statement archive. Enable the Monthly Statement Archive function to give owners access to the archived statements; monthly statement archive access is not available for tenants. After an individual statement has been approved, its Saved Date on the Review Statements screen will update. |
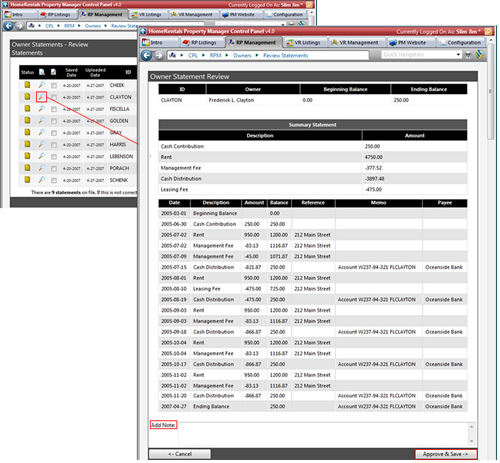
Figure 29a
Correcting Statement Errors
All statement errors must be corrected in PROMAS; online statement data cannot be edited. Do not approve an erroneous statement, instead click Cancel to return to the statement list to continue reviewing and approving the other pending statements. After correcting the error in PROMAS, publish the statement again and then approve the corrected statement online. The user can restrict the PROMAS statement upload to an individual client's statement when correcting statement errors.
Approve a Batch of Statements
Mark checkboxes beside individual statement records to select a group of pending statements for batch approval, or mark all of the pending statements for approval at once by clicking on the icon at the top of the approval checkbox column (Figure 29b). Click Approve Marked to make these statements active in the clients' online accounts. After the batch of statements have been approved, their Saved Dates on the Review Statements screen will update.

Figure 29b