To create a reservation, the user must first define which property the reservation is for. That is the reason there is no direct link to the Create Reservation screen from the Control Panel. There are three ways to get to the create reservation module. First from the VR Listing itself, second from the Tape Chart, and third from the Property Lookup. (Figure 52a)
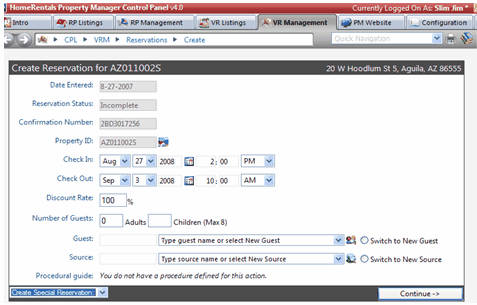
Figure 52a
Once you’ve started a reservation using one of the above methods, you’ll be granted a reservation lock for the property. This means that nobody else can create a reservation for this property until you have completed your reservation. To begin the Create Reservation process, enter the check in and check out dates, the number of guests, and verify the discount rate. In most cases the discount rate will be left at 100%. The drop down menu at the bottom left of the screen will create a special reservation as discussed in Special Reservations. If the guest is a repeat customer, they will be in the history with an ID already created. In this case the guest should be selected from the guest list found with the drop down menu beside “Guest” or by entering the first few letters of his guest ID in the box (Figure 52b).

Figure 52b
If this reservation is the first time the guest will be a customer, select the bullet for New Guest. Repeat this process for the source of the reservation (Figure 52c). A source can be a marketing campaign (i.e. yellow pages, newspaper ad, etc.), a travel agent, or a referrer (another real estate company, etc.). The source of this reservation is HomeRentals.
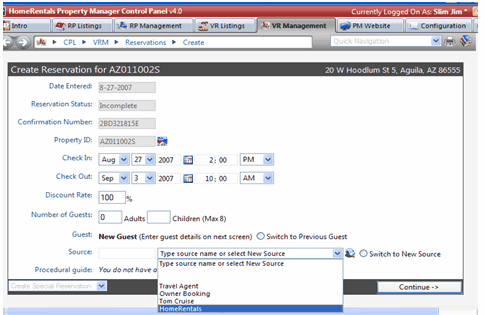
Figure 52c
If the bullet for New Guest has been selected, the user will next create the Guest Profile. Had the Guest been selected from the drop down menu, the existing profile would populate into this screen (Figure 52d).
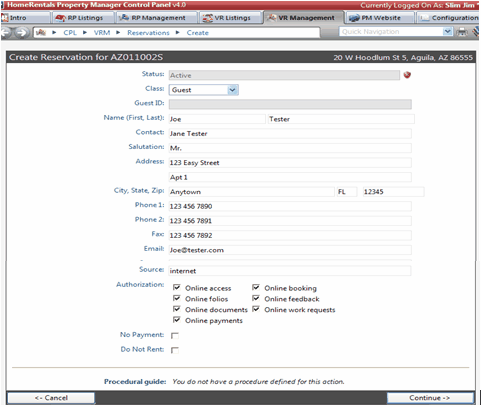
Figure 52d
The status of this new guest is “active” as when the reservation has been completed, the guest will be “active”. The red shield next to the guest status indicates that there is not a correlation for this guest between PROMAS and HomeRentals. When the guest is in both systems and a sync has been preformed, the shield will be green indicating that the sync has been successful. The class of this guest is “guest”, but could be changed by the user to Occupant, Prospect, Group, Owner, or Guest of Owner as necessary. These other classes of guest would be largely defined by the users company policies. Next the guests' first name in the first name box and then last name in the last name box are input. The guest ID will be created using the first 5 characters of the last name and first three characters of the first name. It is important that the name be input correctly, so that the guest ID will be correctly generated by the system. The rest of the guests' information is then entered. If the guest does not have an email address, they will not have online access to their account. They will not be able to make online payments. Next, the user would set the online authorizations for the guest. The No Payments and Do Not Rent boxes are for a guest that has provided a bad experience to the company at some time in the past. Click on the continue button to proceed or the cancel button to back out of the Create Reservation module at this point.
Rent and Reservation (Figure 52e)
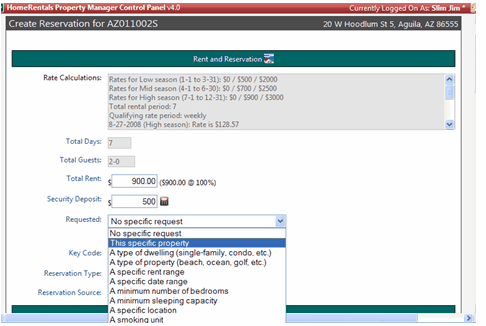
Figure 52e
The first box, Rate Calculations displays the seasons and rates for the unit and calculates the Total Rent for the reservation based on the number of days, the seasons, and the number of guests for the reservation. If the listing had a charge for extra guests it would be included, also if the reservation incorporated dates in two different seasons the system would calculate a rate based on the nightly rate for each season. The user has the option of keeping the generated Total Rent rate, or changing it to another value if necessary. The security deposit entered in the listing is populated automatically. The “Requested” box has several options available. This is not a required field, but is useful information to have on file. If the unit became unavailable for some reason, this information could help determine an alternative unit. This information may be further defined by the user, in this example the user entered that the guest requested this specific unit because a friend had stayed there (Figure 52f). The key code from the listing would be displayed if there was one. The Reservation Type for the normal situation is Guest, but could be an Owner Reservation, or a Manager Reservation.
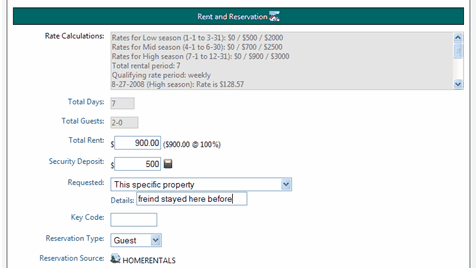
Figure 52f
Fees and Extras (Figure 52g)
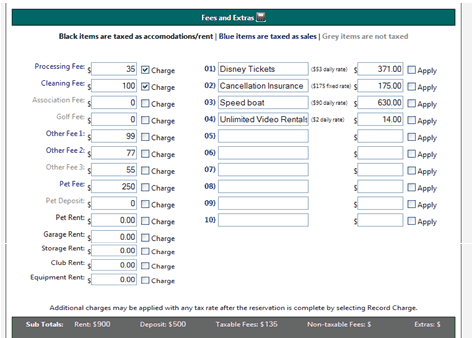
Figure 52g
Items on this table shown in blue are taxed at the sales tax rate and items in black at the accommodations tax rate. The first two, Processing Fee and Cleaning are always charged by the system unless the user unchecked the box next to them marked charge. These numbers can be modified to anything of your choosing. The user has the option to charge any of the fees shown simply by checking the box. Items 1-10 are defined in the configuration section of VR Preferences. The gray bar at the bottom summarizes the total charges before any tax is added for the reservation.
Taxes (Figure 52h)
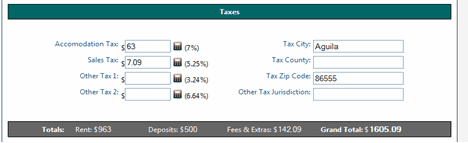
Figure 52h
While the user may change these values, they are calculated based on the tax rates posted in the listing. There should not be any reason that the user would change these values under the normal course of business. You should ultimately rely on your PROMAS data for tax calculations and remittances. The gray bar at the bottom shows totals for all charges, including the taxes and shows the Grand Total for this reservation.
Payment Schedule (Figure 52i)

Figure 52i
The default payment schedule is that the first payment is due within 10 days of the reservation, the second 90 days prior arrival and the third 30 days prior to arrival. To equally divide the payments over these three dates simply click the red shield next to Payment Schedule in the green bar (Figure 52j).
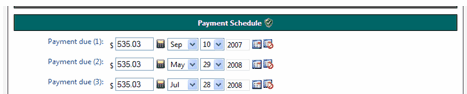
Figure 52j
The shield will turn green, indicating that the payment schedule amounts add up to the amount due for the reservation. If for some reason, the user wishes to use a different schedule, they can enter different amounts and or dates (Figure 52k).

Figure 52k
Again, when the amounts shown in the payment schedule add to the total for the reservation, the shield will turn green. If the last date has no amount due corresponding to it, it will not be shown on any of the reservation documents. Only two payments will show for the above example.
The last step in creating the reservation is to assign cleaning workorders to the unit. (Figure 52l) The user has the option to assign an arrival and a departure cleaning workorder. Normal practice would be to assign both and then as the check in date approaches the arrival workorder can be canceled if the unit had been recently cleaned. Click on the Continue button and the reservation is complete, or on the Cancel button to delete the reservation before it is completed.

Figure 52l
The reservation will now be displayed in the Reservation Lookup form, with the additional prompt for the user to create a Confirmation Letter (Figure 52m).
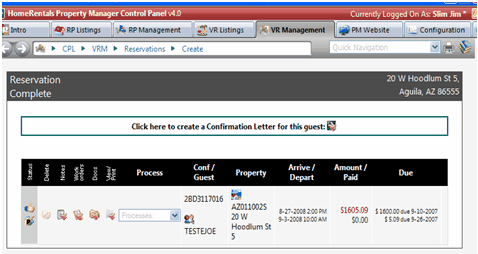
Figure 52m